Ever looked at a tape measure and felt a bit lost? You are not alone, actually. Many folks find all those little lines and numbers a little confusing at first glance, and that is quite normal. Getting a good handle on how to figure out tape measure measurements is a skill that really comes in handy for so many things around the house, or even for creative projects. It is a core ability for anyone wanting to build, fix, or create with precision, you know.
Whether you are putting up a new shelf, figuring out if a piece of furniture will fit, or cutting material for a craft project, getting your measurements right is very important. A small mistake in reading those marks can, in a way, lead to big problems later on, like things not fitting or looking quite right. This guide is here to help you get comfortable with your tape measure, turning what might seem like a tricky tool into something you can use with confidence, pretty much every time.
Just as Open Library works to make all sorts of books and information available for everyone to read, borrow, and discover, we want to make understanding your tape measure totally clear for you today, May 23, 2024. We will go through the basics, so you can start measuring like a pro, and that is a pretty good feeling, too it's almost.
Table of Contents
Getting to Know Your Tape Measure
- What is a Tape Measure?
- The Hook and the Case
- The Locking Mechanism
The Language of the Tape Measure: Inches and Feet
- Understanding the Main Marks
- The Inch Markings
- Feet Markings and the "Stud Finder" Marks
Breaking Down the Inch: Fractions Explained
- Half-Inch Marks
- Quarter-Inch Marks
- Eighth-Inch Marks
- Sixteenth-Inch Marks and Beyond
- Tips for Reading Small Lines
Reading Measurements: Step-by-Step
- Starting Your Measurement
- Finding the Whole Inch
- Adding the Fractions
- Putting it All Together: Examples
Achieving Precision: Tips for Spot-On Measurements
- Holding the Tape Measure Correctly
- Avoiding Sag and Bend
- Marking Your Spot
- Double-Checking Your Work
Common Tape Measure Features You Might See
- The Black Diamonds
- Metric Measurements
- The Tape Measure's Hook
Frequently Asked Questions About Tape Measures
- What do the different lines on a tape measure mean?
- How do I read a tape measure in fractions?
- What are the red marks on a tape measure for?
Keep Practicing and Measuring
Getting to Know Your Tape Measure
What is a Tape Measure?
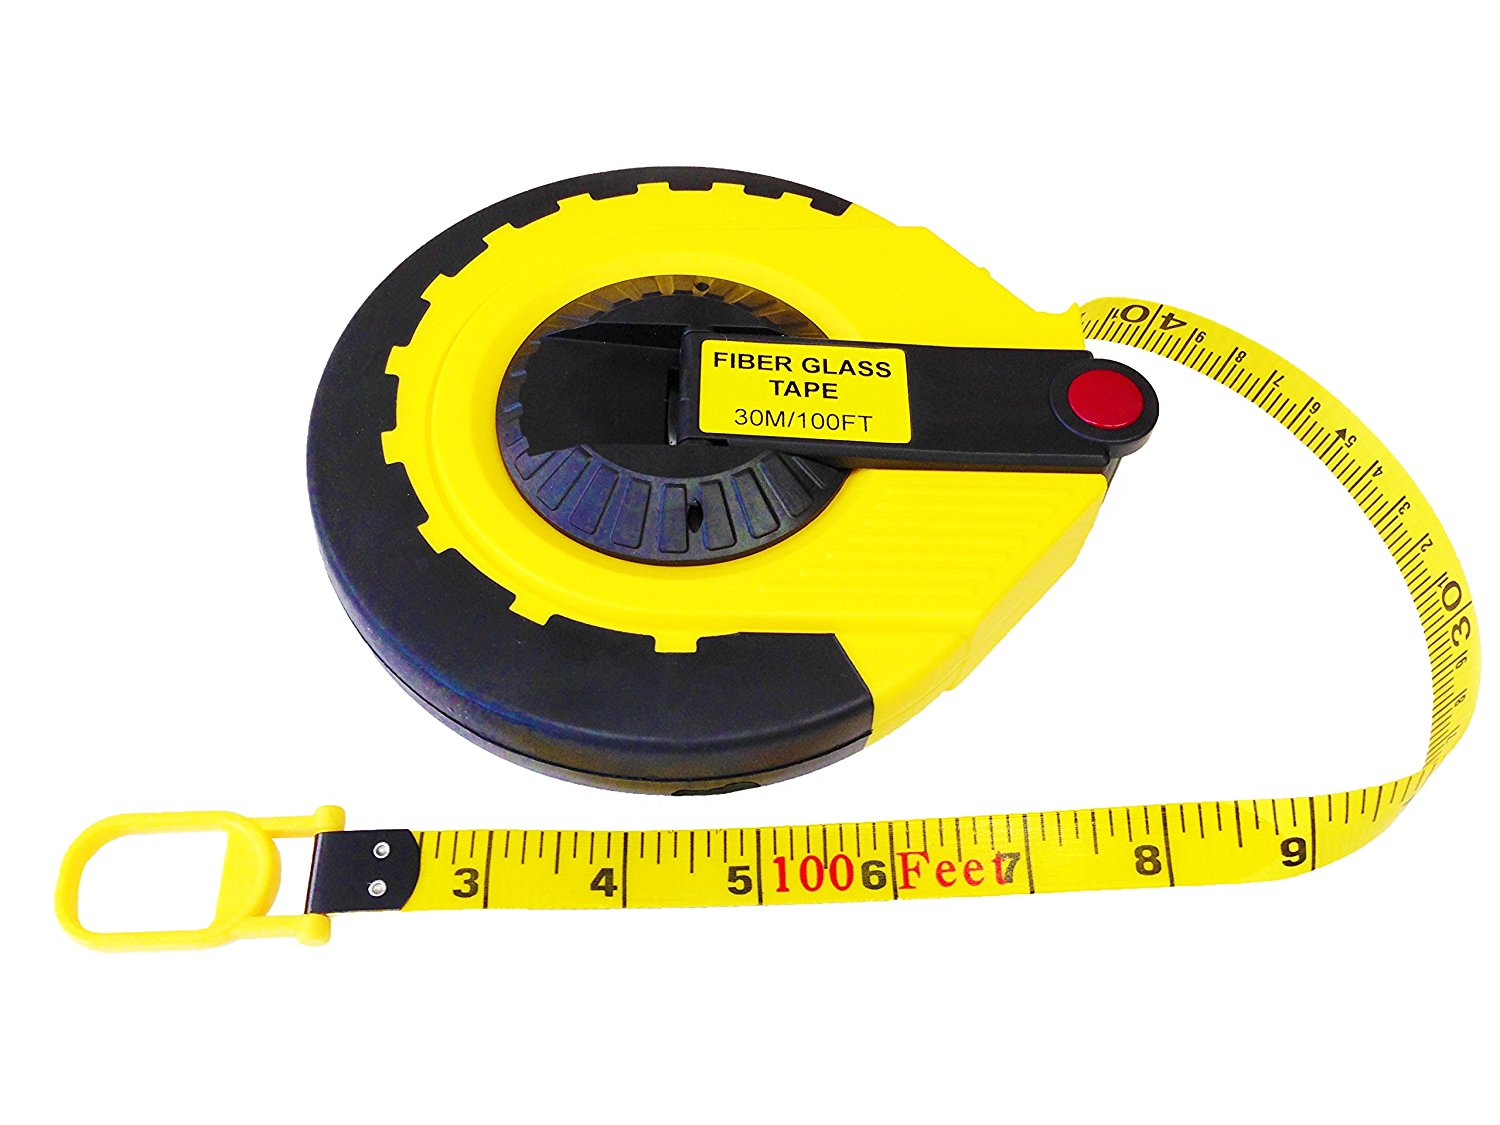
A tape measure is a tool that helps you figure out distances or lengths. It is basically a long, flexible strip, usually made of metal or cloth, with markings on it, you know. This strip winds up into a compact case, which makes it very easy to carry around and store, and that is a big plus.
The Hook and the Case
At one end of the tape, there is a small metal piece called the hook, or sometimes the end hook, you see. This hook is quite important because it helps you grab onto the edge of whatever you are measuring, which really keeps the tape steady. The main part of the tape measure, the part you hold, is called the case, and it protects the tape inside, usually.
The Locking Mechanism
Most tape measures have a little button or lever that lets you lock the tape in place once you pull it out, you know. This is super helpful because it keeps the tape from retracting while you are trying to read a measurement or mark a spot, so it is a really useful feature, actually.
The Language of the Tape Measure: Inches and Feet
Understanding the Main Marks
When you pull out a tape measure, you will see a lot of lines of different lengths, and that is how it works. These lines represent different units of distance. The biggest, longest lines usually show whole inches, and then smaller lines show fractions of an inch, too it's almost.
The Inch Markings
Every whole inch is marked with a number, usually a pretty big one, so it is easy to spot. These numbers often get bigger as you move down the tape, from one, to two, to three, and so on, you know. These are your main reference points when you are trying to figure out a length, and they are quite important, really.
Feet Markings and the "Stud Finder" Marks
On many tape measures, you will notice special marks for feet, usually at every 12 inches, which is pretty standard. Sometimes these foot marks are in red, or they might have a little symbol next to them, like a single prime mark ('). Also, you might see small black diamond shapes every 16 inches, which are actually for finding studs in walls, especially for building projects, you see.
Breaking Down the Inch: Fractions Explained
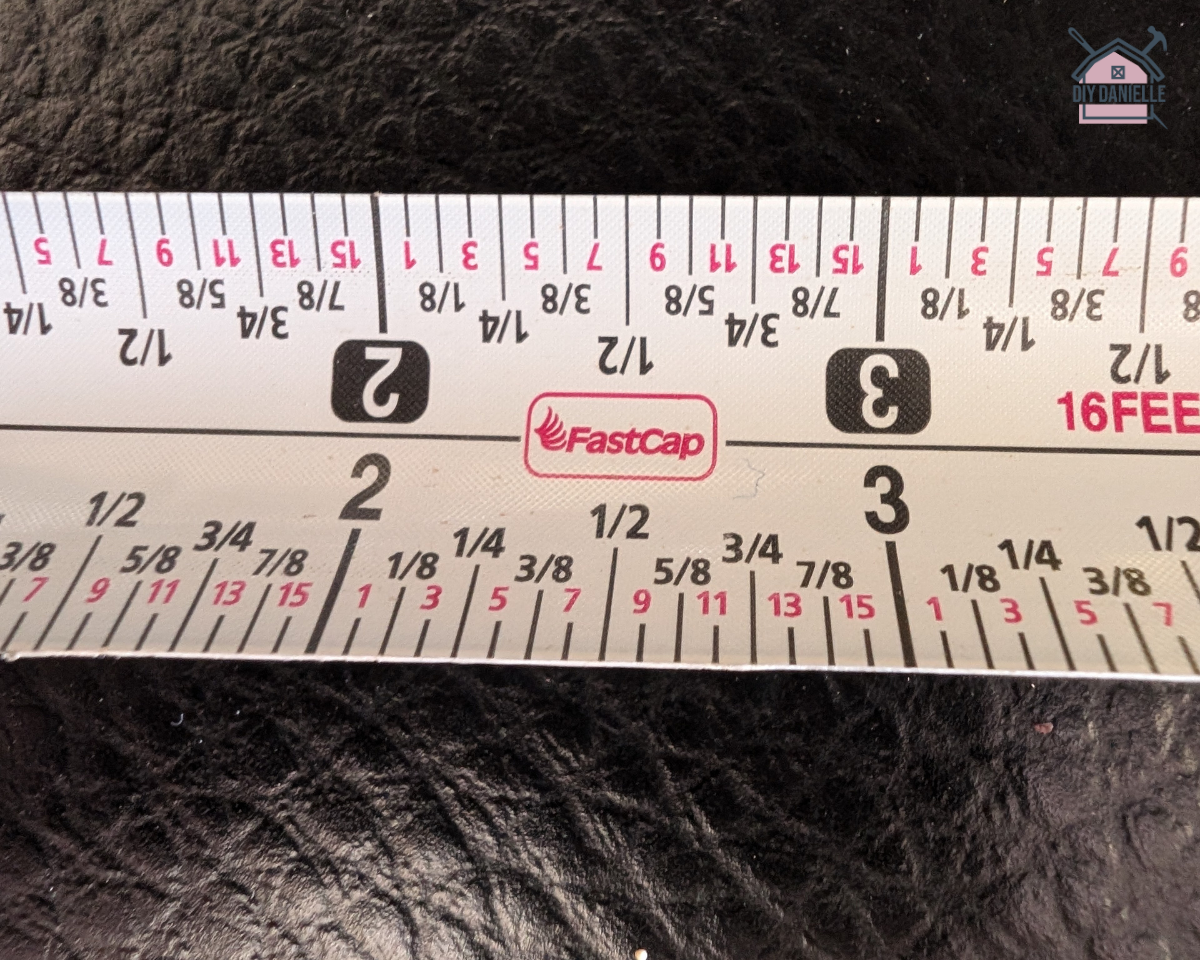
Half-Inch Marks
Between any two whole inch marks, the longest line that is not a whole inch is typically the half-inch mark, you know. This line is usually a bit shorter than the whole inch lines but longer than the other fractional lines, so it stands out quite a bit.
Quarter-Inch Marks
Next, you will find lines that show quarter inches. There are usually two of these between the whole inch and the half-inch mark, and two more between the half-inch and the next whole inch, so that is how they are set up. These lines are a little shorter than the half-inch marks, but still quite visible, you see.
Eighth-Inch Marks
As you get to smaller divisions, you will see eighth-inch marks. These are shorter than the quarter-inch marks, and there are more of them packed in, you know. You will find one of these between each quarter-inch mark and the next, so it really breaks things down further.
Sixteenth-Inch Marks and Beyond
The smallest common markings on a tape measure are the sixteenth-inch marks. These are the shortest lines you will see, and they are really close together, you know. Some very precise tape measures might even go down to thirty-second or sixty-fourth inch marks, but sixteenths are usually what you will work with most often, so that is pretty much it for most tasks.
Tips for Reading Small Lines
When you are looking at those very tiny lines, it can be a bit tricky, apparently. A good tip is to count the spaces between the whole inch mark and the line you are looking at, rather than counting the lines themselves, you know. For example, if you are looking at the third small line after a whole inch, and the smallest division is a sixteenth, then that would be three sixteenths past the inch, so it is a little trick to remember.
Reading Measurements: Step-by-Step
Starting Your Measurement
To begin, make sure the end hook of your tape measure is firmly against the starting point of what you are measuring, you see. If you are measuring an inside distance, like inside a window frame, some tape measures have a special calculation for the hook's thickness, so you might want to check that, or just use the inside edge of the hook for a more precise reading, basically.
Finding the Whole Inch
First, find the last whole inch mark that your measurement passes, you know. This will be the main number for your measurement. For example, if your item goes past the 10-inch mark but not yet to the 11-inch mark, then your measurement starts with 10 inches, and that is your base number.
Adding the Fractions
After you have your whole inch, look at the lines between that whole inch and where your measurement ends, you see. Count how many of the smallest lines (usually sixteenths) there are from the whole inch mark up to your stopping point. Then, simplify that fraction if you can, so it is easier to work with, typically.
Putting it All Together: Examples
Let us say your measurement goes past the 5-inch mark, and then it stops at the fourth small line after the 5, and these small lines are sixteenths, you know. That means your measurement is 5 and 4/16 inches. You can simplify 4/16 to 1/4, so the final measurement is 5 and 1/4 inches, which is pretty straightforward, really. Another example: if it hits the 8-inch mark and then the line right before the half-inch mark, that would be 8 and 7/16 inches, so it is just about counting those little marks.
Achieving Precision: Tips for Spot-On Measurements
Holding the Tape Measure Correctly
When you are measuring, it is important to keep the tape measure flat and straight, you know. Avoid letting it twist or bend, especially over longer distances, because that can really throw off your numbers, so it is something to watch out for. Hold the case firmly, and try to keep the tape parallel to the surface you are measuring, basically.
Avoiding Sag and Bend
For longer measurements, a tape measure can sometimes sag in the middle, which makes your reading shorter than it actually is, you see. If you are measuring a long distance, try to have someone help you hold the tape straight, or use a rigid measuring stick if possible, so that is a good idea. For short distances, make sure the tape is not bending upwards or downwards, as even a slight curve can change the result, you know.
Marking Your Spot
Once you have read your measurement, use a pencil or a marker to make a clear, thin mark right at the exact point on your material, you know. A thick mark can make your measurement less precise, so try to be as neat as you can, pretty much. It is often a good idea to make a small "V" shape with the point of the "V" at your exact measurement, so you know exactly where to cut or drill, for example.
Double-Checking Your Work
It is always a really good idea to measure twice, or even three times, to make sure you have the correct number, you know. This is especially true for projects where accuracy is very important. Sometimes, just shifting your angle slightly can change the reading, so taking multiple measurements helps confirm you are right on target, and that is a smart move, usually.
Common Tape Measure Features You Might See
The Black Diamonds
You might notice black diamond shapes printed along the tape, often every 19.2 inches, you know. These are actually for spacing roof trusses or floor joists evenly in construction, so they have a very specific purpose. They are sometimes called "black stud marks" too, because they help with structural framing, basically.
Metric Measurements
Some tape measures have both imperial (inches and feet) and metric (centimeters and millimeters) measurements on them, you see. The metric side usually has larger numbers representing centimeters, with smaller lines for millimeters. If you are working with plans that use the metric system, this dual measurement feature is super handy, so it is a nice thing to have.
The Tape Measure's Hook
The hook at the end of your tape measure is designed to move slightly, you know. This little bit of play is actually intentional! It allows for accurate inside measurements (where the hook pushes in) and outside measurements (where the hook pulls out), compensating for the hook's own thickness, so it is quite clever, really.
Frequently Asked Questions About Tape Measures
What do the different lines on a tape measure mean?
The different lines on a tape measure show various units of length, you know. The longest lines usually mark whole inches, and then the progressively shorter lines show fractions of an inch, like halves, quarters, eighths, and sixteenths, so that is how they are organized, basically.
How do I read a tape measure in fractions?
To read a tape measure in fractions, first find the last whole inch mark, you see. Then, count the number of smaller lines from that whole inch to your measurement point. The shortest lines typically represent sixteenths of an inch, so you count those and put that number over 16, then simplify the fraction if you can, pretty much.
What are the red marks on a tape measure for?
The red marks on a tape measure often highlight standard framing measurements, you know. For example, every 16 inches is a common spacing for wall studs, so these red marks make it easier to find those spots quickly when you are building something, so it is quite helpful, actually. Sometimes, they also just show the foot marks for easy identification, too it's almost.
Keep Practicing and Measuring
Getting good at reading a tape measure just takes a little bit of practice, you know. The more you use it, the more natural it will feel to quickly spot those whole inches and figure out the fractions. Do not be afraid to grab your tape measure and just measure random things around your house, like a book, a table, or even your hand, so that is a good way to start. Each time you do it, you will get a little bit better, and soon you will be measuring with complete confidence, and that is a very useful skill to have, really.
You can learn more about tools and measurements on our site, and find more helpful guides like this one by checking out our other resources. Just keep at it!
Related Resources:

Detail Author:
- Name : Dr. Stephon Boehm
- Username : leslie.jerde
- Email : sonia.lueilwitz@yahoo.com
- Birthdate : 1988-03-02
- Address : 6152 Keegan Ramp Suite 056 Santinoshire, ME 23367
- Phone : +1-205-325-8689
- Company : White-Rice
- Job : Ship Carpenter and Joiner
- Bio : Quis adipisci ut veniam ea reprehenderit. Facere quis tenetur ullam similique similique pariatur nostrum. Ipsum quia exercitationem vel eligendi labore corporis. Velit ipsa aspernatur amet aut et.
Socials
instagram:
- url : https://instagram.com/donnellyc
- username : donnellyc
- bio : Quo sapiente quidem deserunt qui consequatur. Ratione non omnis excepturi ea explicabo.
- followers : 611
- following : 775
linkedin:
- url : https://linkedin.com/in/cyrildonnelly
- username : cyrildonnelly
- bio : Quia aut nesciunt est quasi beatae.
- followers : 4591
- following : 2781
tiktok:
- url : https://tiktok.com/@donnelly1977
- username : donnelly1977
- bio : Nihil id et unde dolorem in. Fugit consequuntur tempora dolorem ab ea.
- followers : 2808
- following : 2611
