Ever tried to hang a picture or build something, only to find your measurements were just a little off? It can be pretty frustrating, you know, when your hard work doesn't quite line up. A small mistake with a measuring tool can actually make a big difference in how your finished project looks and works.
Getting measurements right is a big deal for any home repair or building project, big or small. You want to feel good about what you're making, and that confidence really comes from knowing your numbers are precise. My text says, "Learn how to read a tape measure correctly so you can complete your project with confidence!" and that's exactly what we're aiming for here.
This guide is all about helping you get a grip on that handy tool, the tape measure. We'll show you how to use a measuring tape like a pro, helping you master basic home repairs and DIY building projects with ease. So, let's get into the simple steps to make sure your next project is perfectly measured, every single time.
Table of Contents
- What is a Tape Measure, Anyway?
- Why Accurate Measurements Matter So Much
- The Basics of Reading a Tape Measure in Inches
- Getting Started: Your First Measurement
- Tips for Pro-Level Measuring
- Metric vs. Imperial Systems: What's the Difference?
- Common Tape Measure Features You Should Know About
- Practice Makes Perfect: Getting Comfortable
- Frequently Asked Questions About Tape Measures
What is a Tape Measure, Anyway?
A tape measure, you know, is that really common tool that helps you find out how long things are. It's basically a flexible ruler, usually made of metal, that winds up into a small case. It has markings all along its length, which is that, for telling you distances. Pretty much every home has one, or at least it should, for all those little jobs that come up. It's incredibly useful, seriously, for everything from hanging a picture to building a whole new shelf.
Why Accurate Measurements Matter So Much
Getting your measurements spot-on is super important, honestly, for a lot of reasons. If your measurements are off, even by a tiny bit, your project might not fit right, or it could look a bit crooked. My text says, "It’s important to know how to correctly read a tape measure to ensure you can transfer measurements from plans and get accurate measurements throughout your project." This means if you're building something from a set of plans, your measurements need to match those plans exactly, or else you'll have problems later on. It saves you time, materials, and a whole lot of frustration, too it's almost, when things just fit together like they're supposed to.
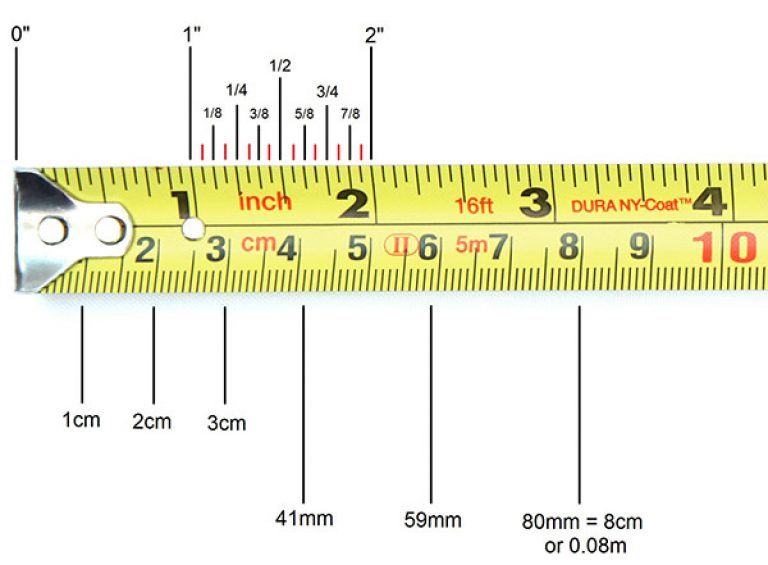
The Basics of Reading a Tape Measure in Inches
Okay, so let's get down to the actual reading part. Most tape measures in countries like the U.S. use inches and fractions of an inch. You'll see big numbers and then lots of smaller lines between them. My text explains, "To read a tape measure, find the number next to the large tick, and then find how many small ticks past it the measurement is, Add the number next to the large tick with the." This is the core idea, basically, for figuring out your measurement.
Understanding the Markings: A Closer Look
An inch on a tape measure is broken down into smaller parts. Usually, you'll find that an inch is divided into 16 smaller marks. My text mentions, "I think the easiest way is by understanding and learning what the 16 markings of an inch stand for." This is a really good point, because once you get what each line means, reading the tape becomes much simpler. The longest line between two numbers is usually the half-inch mark. Then you have quarter-inch marks, and then eighth-inch, and finally the smallest ones are sixteenth-inch marks. It's a bit like a ruler, but with more detail, you know.
Breaking Down Fractions: Halves, Quarters, Eighths, and Sixteenths
Let's talk about those fractions. Between any two whole numbers, like between 1 and 2, you'll see a bunch of lines. The longest line in the middle is the 1/2 inch mark. So, if your measurement hits that line after the 1, it's 1 and 1/2 inches. Then, between the 1 and the 1/2 mark, and between the 1/2 mark and the 2, you'll find slightly shorter lines. These are the 1/4 inch marks. So, 1 and 1/4, 1 and 1/2, 1 and 3/4. After that, you get the 1/8 inch marks, which are even shorter. And the very shortest lines are the 1/16 inch marks. There are 16 of these tiny lines in every inch, obviously, which makes sense for the name.
To read a measurement, you first find the last whole inch mark you passed. Then, you count the number of 16th-inch marks past that whole inch. For example, if you're past the 5-inch mark and your measurement lands on the third small line after it, that's 5 and 3/16 inches. If it lands on the eighth small line, that's 5 and 8/16 inches, which simplifies to 5 and 1/2 inches. It just takes a little practice to get quick at reducing those fractions, but it's not too bad, really.
Getting Started: Your First Measurement
So, how do you actually take a measurement? My text gives a great starting point: "To read a measuring tape, line the zero mark up at the edge of the item you're measuring, then stretch the tape all the way across the item, Try to keep the tape straight to." This is pretty much the first rule. You want to make sure the very beginning of the tape, usually a metal hook, is right at the start of whatever you're measuring. Then, you pull the tape straight across to the other end of the item. Keeping it straight is super important, you know, because if it sags or bends, your measurement won't be right. You then look at where the end of your item lines up on the tape. That's your measurement, more or less.
Tips for Pro-Level Measuring
While reading a tape measure seems simple enough, there are some clever ways to make your measuring quicker and even more precise. My text says, "While it's fairly straightforward to read a tape measure, some tips and tricks can make your measuring quicker and more accurate, Plus, we'll help you unlock tape measure features." These little tricks really do help you get better results and work with more confidence. It's like, a bit of a secret handshake for DIY folks, in a way.
Keeping the Tape Straight: A Key Step
Seriously, one of the biggest mistakes people make is not keeping the tape measure straight. If it bows or sags, especially over longer distances, your measurement will be shorter than it actually is. Always try to keep the tape taut and flat against the surface you're measuring. For longer measurements, it might help to have someone hold the other end, or you can use a clamp to secure the hook. This is a very simple tip, but it makes a huge difference, honestly.
Using the Hook Like a Pro: Inside and Outside Measurements
That little metal hook at the end of your tape measure is actually pretty smart. It's designed to move slightly. This movement is for accuracy when taking both inside and outside measurements. When you hook it onto the edge of something (an outside measurement), the hook's thickness is included in the measurement. When you push it against an inside corner (an inside measurement), the hook slides back, and its thickness is subtracted. This means the zero point is always exactly where it should be, which is pretty clever, actually. So, you don't have to worry about adding or subtracting the hook's thickness; the tape does it for you. This is a feature many people don't even realize they have, you know.
Reading the Smallest Marks: Getting Super Precise
Sometimes, you need to be super precise, like down to the smallest fraction. My text points out, "Ahead, we break it down to the literal millimeters to ensure you get the most accurate measurement possible, every single time." Even if you're working in inches, sometimes your measurement will fall between two 16th-inch marks. In those cases, you have to decide which 16th mark it's closest to. For most home projects, getting within a 16th of an inch is usually good enough. But for really fine work, you might need to be even more careful. Just try to get your eye right over the mark you're reading to avoid parallax errors, which is when your eye angle makes the line look like it's somewhere else. It's a simple trick, but really effective.
Metric vs. Imperial Systems: What's the Difference?
Not all tape measures are the same, you know. My text mentions, "Learn how to read both metric and imperial tape measures properly, This guide covers everything from reading a tape measure in inches to metric systems like centimeters and millimeters, We’ll also show you how to read measurements on a." In the U.S., you'll mostly see imperial tape measures, which use inches and feet. But in most other parts of the world, they use the metric system, which means centimeters and millimeters. Metric tapes are usually easier to read because they use a base-10 system. Each centimeter is divided into 10 millimeters, which is pretty straightforward. There are no fractions to deal with, just whole numbers and decimals. So, if you see a tape measure with numbers like 10, 20, 30, and then smaller lines between them, that's probably a metric one. Knowing the difference is important, obviously, so you don't accidentally build something in the wrong scale!
Common Tape Measure Features You Should Know About
Tape measures have some hidden features that can make your life a lot easier. My text says, "Plus, we'll help you unlock tape measure features." These aren't just for showing off; they actually serve a purpose for specific types of building work. Knowing what they mean can really speed up your projects and make them more accurate, too it's almost, without you even trying that hard.
Stud Marks and Truss Layout
On many tape measures, you'll see a small black diamond or triangle every 16 inches. These are called "stud marks." They're there to help you find the studs behind your drywall, which are typically spaced 16 inches apart in most homes. This is super handy for hanging heavy items, like a TV, or for finding where to attach new shelving. You might also see red numbers at 16-inch intervals, which also mark stud centers. It's a quick visual cue, really, that saves you from having to measure out 16 inches repeatedly. Builders use these all the time, obviously, for framing walls and stuff.
Black Diamonds and Joist Spacing
Beyond the 16-inch stud marks, some tape measures also have small black diamonds at 19.2-inch intervals. These are for spacing floor joists or roof trusses. While not as common for everyday DIY, if you're ever involved in bigger construction projects, knowing what these mean can be a real time-saver. It's another example of how a tape measure has these little built-in guides to help with standard building practices. So, if you see those diamonds, you know they're there for a reason, even if you don't use them every day, you know.
Practice Makes Perfect: Getting Comfortable
Like anything new, getting good at reading a tape measure just takes a little practice. Grab a tape measure and start measuring things around your house. Measure a book, a table, a door frame. Try to get down to the 16th of an inch. The more you do it, the more natural it will feel. Soon enough, you'll be able to quickly glance at the tape and know the measurement without really thinking about it. It's a skill that builds confidence, and honestly, makes all your future projects much more enjoyable. My text says, "Read this guide to know how to use a measuring tape like a pro," and practice is definitely how you get there. You can also find more tips on using various tools by visiting a reputable tool guide website, like this one, which can offer even more practical advice for your projects.
Frequently Asked Questions About Tape Measures
Here are some common questions people ask about using a tape measure:
How do I read a tape measure with all those lines?
Basically, you find the nearest whole inch mark, then count the smaller lines after it. Each small line usually represents a 16th of an inch. So, you'll say the whole inch number, then how many 16ths past it you are. For example, it could be 3 and 5/16 inches, or something like that.
What do the different sized lines on a tape measure mean?
The different lengths of lines help you quickly identify fractions. The longest line between numbers is usually the half-inch mark. Slightly shorter lines are quarter-inch marks. Even shorter ones are eighth-inch marks, and the very shortest lines are sixteenth-inch marks. They're just visual cues, you know, to help your eye.
How do I get really accurate measurements with a tape measure?
To get super accurate, always make sure the tape is pulled straight and taut across the item. Keep your eye directly over the mark you're reading to avoid looking at it from an angle. My text suggests, "break it down to the literal millimeters to ensure you get the most accurate measurement possible, every single time," which means being really precise with your eye and the tape. And honestly, practice helps a lot, too.
Learn more about basic home repair tools on our site, and you can also find helpful tips on choosing the right materials for your next project.
Related Resources:


Detail Author:
- Name : Magnolia Fay
- Username : tristin08
- Email : tyree62@runolfsdottir.com
- Birthdate : 1981-11-05
- Address : 1349 Lesch Junctions Suite 358 Aureliaborough, LA 48135-3342
- Phone : 1-586-349-1767
- Company : Bechtelar, Becker and Bergstrom
- Job : Gas Pumping Station Operator
- Bio : Qui dignissimos occaecati molestiae velit non placeat eum. Facilis iste qui fugit neque nihil laudantium.
Socials
twitter:
- url : https://twitter.com/mina_cassin
- username : mina_cassin
- bio : Alias sit eos sunt eius sed excepturi harum. Nemo asperiores cupiditate minima officia dolorum sunt. Sit blanditiis dignissimos deserunt.
- followers : 1754
- following : 190
instagram:
- url : https://instagram.com/minacassin
- username : minacassin
- bio : Quod ad nesciunt doloremque consequatur eligendi quam. Labore earum quis est.
- followers : 6352
- following : 715
facebook:
- url : https://facebook.com/mina_official
- username : mina_official
- bio : Consequatur sapiente aut ratione ut.
- followers : 373
- following : 1720
tiktok:
- url : https://tiktok.com/@mina7093
- username : mina7093
- bio : Et voluptatem explicabo aut. Qui consequatur repudiandae quia sapiente aliquid.
- followers : 3832
- following : 1950
linkedin:
- url : https://linkedin.com/in/mina.cassin
- username : mina.cassin
- bio : Molestiae qui eaque consequatur.
- followers : 5902
- following : 1444
